OpenAI Codex Tutorial: Free Full Course with Python
A free, 3-hour, project-based OpenAI Codex tutorial for Python developers. Build, test, deploy, and review a real app with Codex.
Article summary
TL;DR
- Learn Codex as an agentic developer: plan work, change multiple files, use tools, and verify the result.
- Build the real Wheel Winner project from a FastAPI endpoint into a tested browser application.
- Control recurring behavior with
AGENTS.mdand a project-levelfastapi-dockerizerAgent Skill. - Use Context7 through MCP, then deploy the container to Google Cloud Run with Terraform and GitHub Actions.
- Add branch coverage and an automated Codex pull request review before release.
Code for this article
Open the repository to follow along.
artem-istranin/codex-course01 / COURSE OVERVIEW
Learn OpenAI Codex by building one application end to end.
This free, 3-hour OpenAI Codex tutorial teaches you to take a Python application from idea to production, with automated tests and CI/CD on GitHub Actions. You’ll create a professional AI coding setup with project instructions and custom Agent Skills. Through MCP, you’ll connect Codex to external tools such as Context7, giving it access to up-to-date technical documentation for the frameworks you use. Across seven episodes, you’ll use that setup to build, deploy, and review an application, learning a workflow you can bring to your own projects. You can inspect every result in the public course repository.
The course treats Codex as more than autocomplete. You will give it a goal, let it inspect a repository, agree on a plan, coordinate changes across files, connect external tools, and use tests and CI to judge the result. This course teaches you to own the software design and software architecture while working more effectively with AI coding agents. Bring agentic coding best practices into your projects and your team’s workflow today!
Who this course is for
The course is for software developers and advanced vibe coders who want a systematic workflow for AI-assisted development. You should be comfortable with a terminal, Git, and reading application code. Python experience helps with the live project, but the agentic workflow applies to other stacks too.
As we progress, we’ll use FastAPI, pytest, Docker, Just, Terraform, Google Cloud, GitHub Actions, and Context7. Let’s begin with the Codex architecture, build a foundation, and then move on to the application.
What you will build
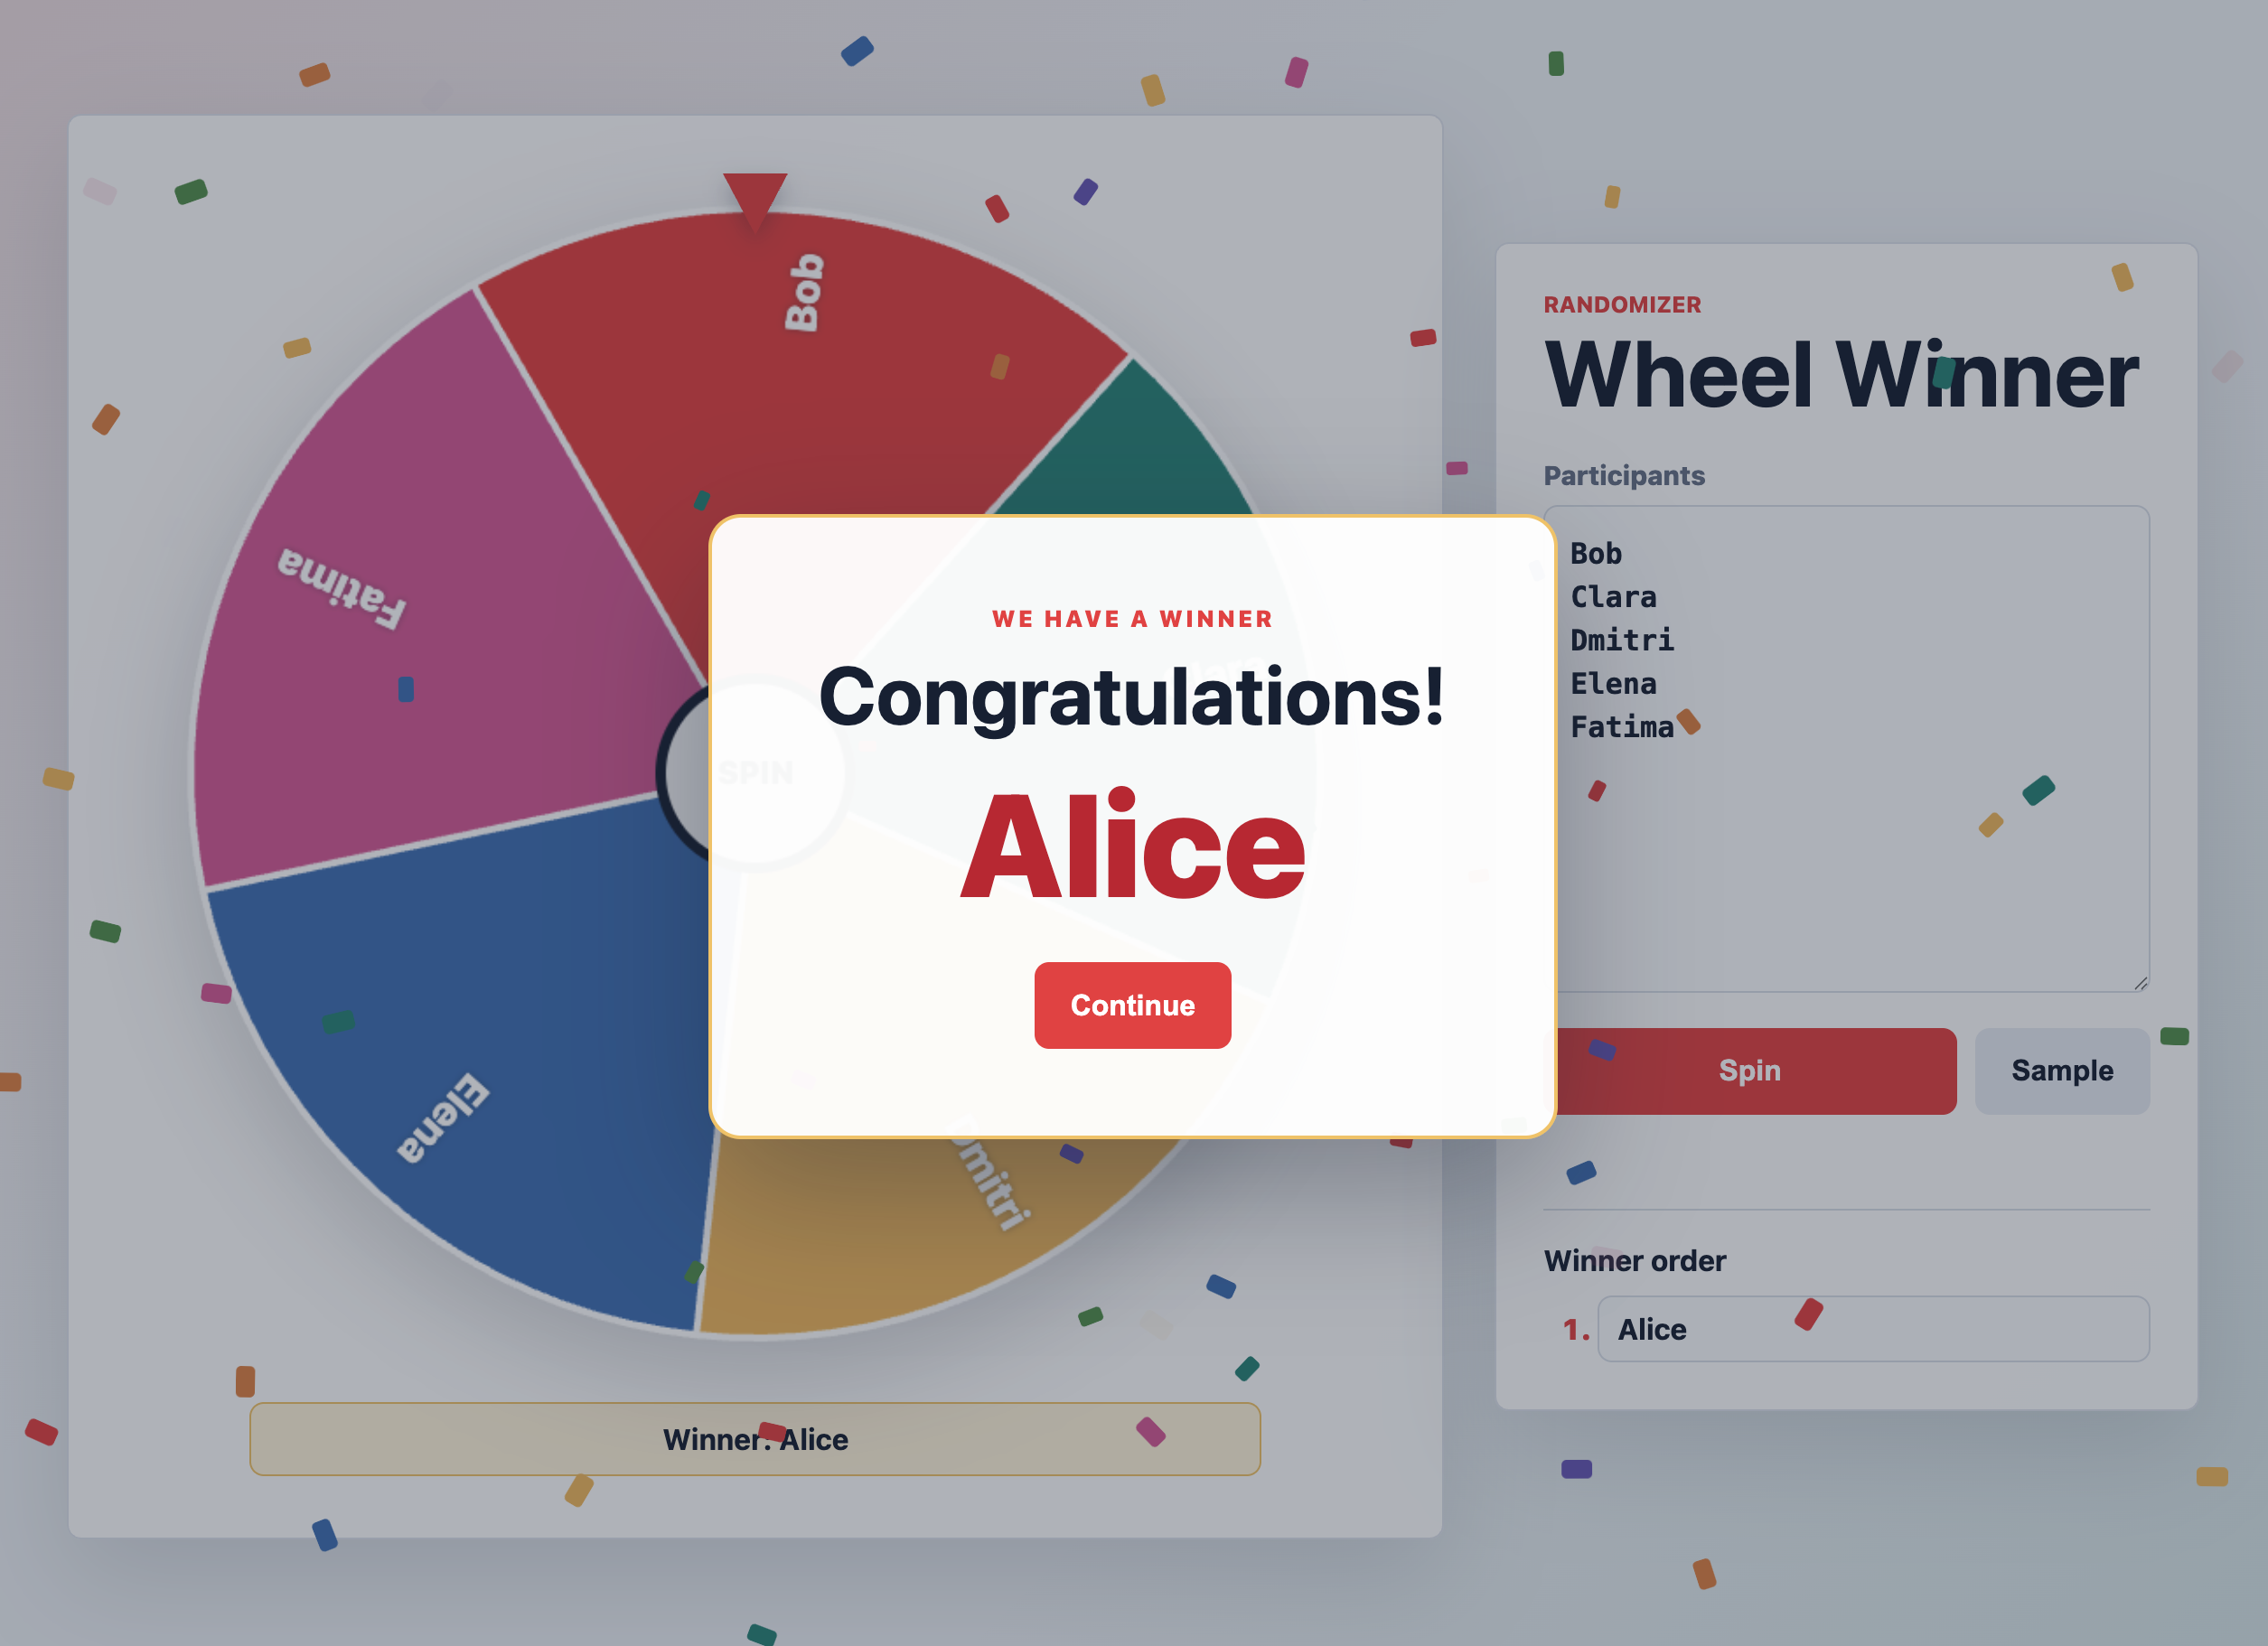
The project is Wheel Winner, a one-page randomizer. You’ve probably seen similar apps used to pick a giveaway winner or decide who goes next in a game.
We’ll build it step by step with a FastAPI backend and a dependency-free HTML, CSS, and JavaScript frontend that draws and animates the wheel.
Then we’ll add automated tests and branch coverage, package the app with Docker, and deploy it to Google Cloud Run. GitHub Actions will handle continuous deployment and automated Codex code reviews.
You’ll see how these parts fit together across the full development process, giving you a workflow you can adapt to your next application with FastAPI, Django, or another framework.
What you will learn
- Understand the Codex architecture: access surfaces, guidance, models, and tools.
- Build a tested FastAPI backend from a concrete API contract.
- Use plan mode before implementing a multi-file frontend.
- Put durable repository rules in
AGENTS.md. - Create a focused Agent Skill with
$skill-creator. - Connect current documentation through an MCP server.
- Containerize the app and deploy it to Google Cloud Run with Terraform and GitHub Actions.
- Add coverage reporting and automated Codex pull request reviews.
We’ll follow the repository’s real commit history: backend, frontend, CI, Docker skill, Context7 and deployment, then AI review. Watch them in order through the complete OpenAI Codex course playlist, or just keep reading this article!
02 / QUICK START
Install Codex and get ready to build.
Start by installing the Codex CLI so you can follow along from your terminal. We’ll build Wheel Winner step by step, and you can use the finished course repository (https://github.com/artem-istranin/codex-course) to check your code as you go.
Install the Codex CLI
On macOS or Linux, use the standalone installer:
curl -fsSL https://chatgpt.com/codex/install.sh | sh
On Windows, run the official PowerShell installer:
powershell -ExecutionPolicy ByPass -c "irm https://chatgpt.com/codex/install.ps1 | iex"
You can also install Codex with npm install -g @openai/codex or brew install --cask codex. See the current Codex CLI guide for authentication and installation details.
Confirm the command is available, create the backend directory, and start an interactive session there:
codex --help
mkdir -p wheel-winner/backend
cd wheel-winner/backend
codex
The working directory matters - it provides the starting context for your Codex session. We’ll explore this in more detail throughout the course. For now, just make sure the Codex CLI launches on your machine and you can send a prompt using one of the available models.
Codex access and usage limits depend on your account or API billing, so use the current official pricing page for up-to-date details.
03 / CODEX ARCHITECTURE
See how guidance and tools turn an LLM into a coding agent.
Let’s explore the Codex architecture and see how its components work together. Codex is powered by an LLM, but the model is only the reasoning layer. The complete agent also needs an access surface, guidance, tools, project context, and feedback from the development environment.
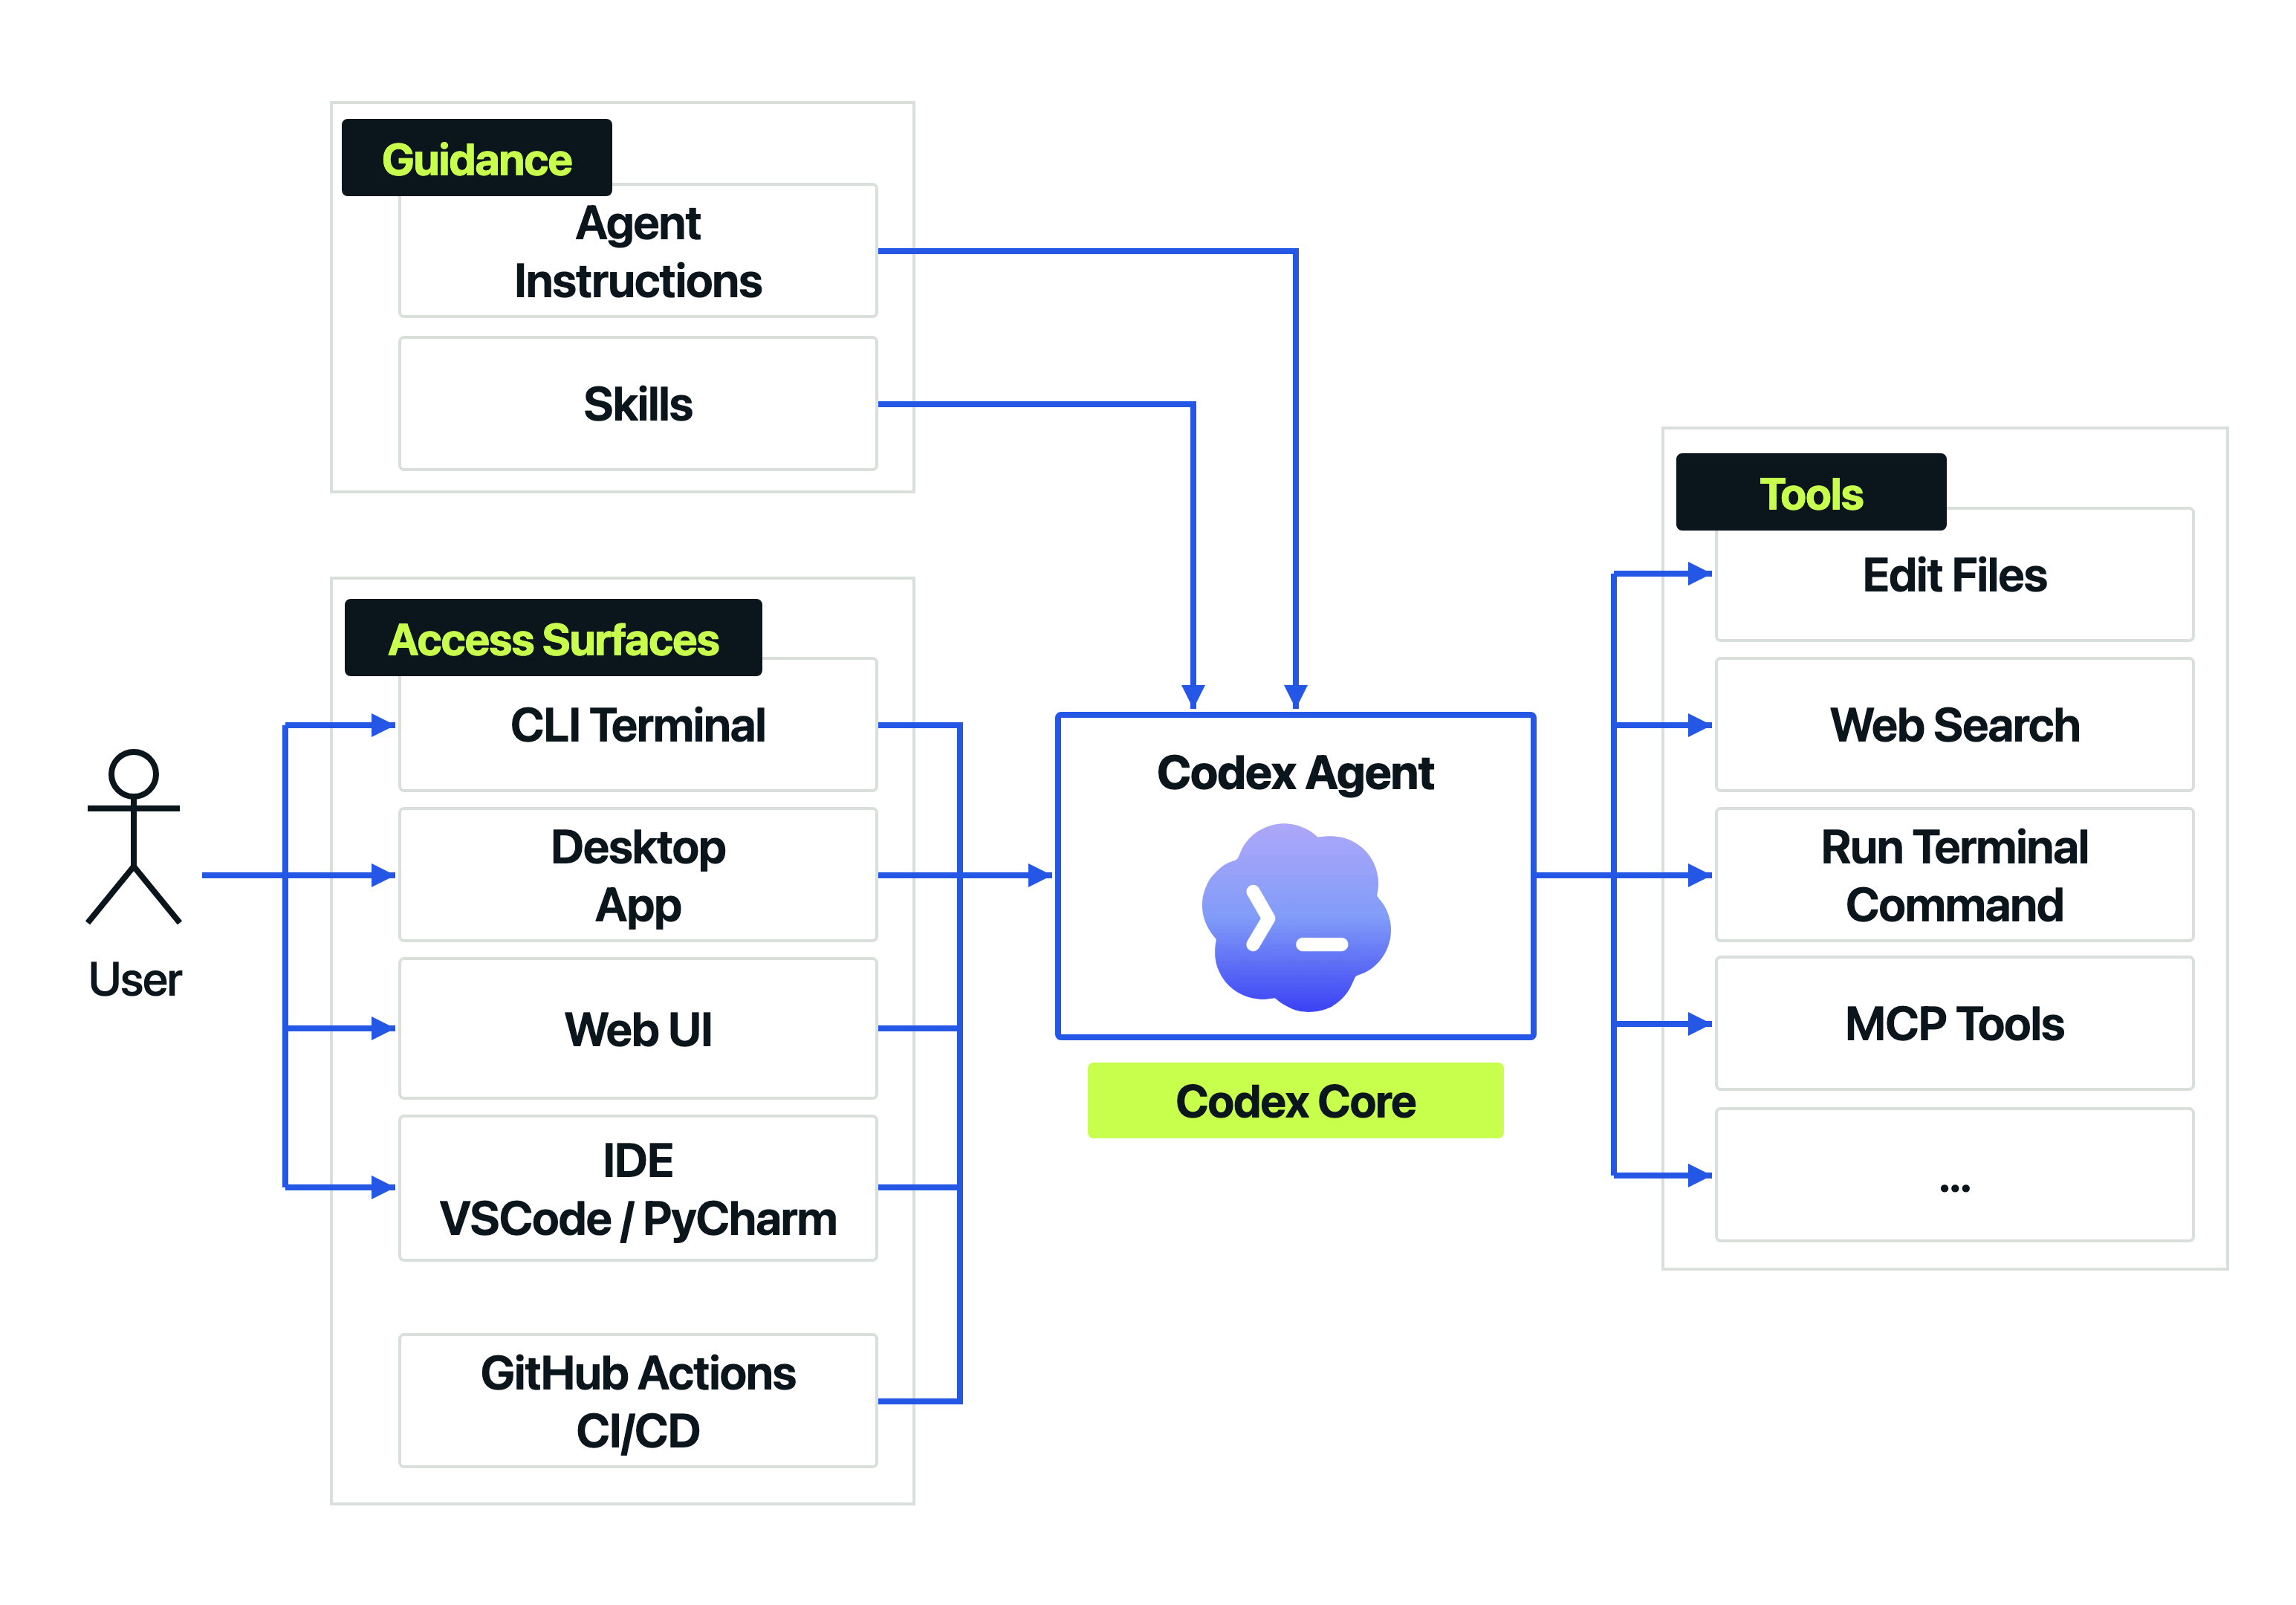
The architecture has three practical parts:
- Access surfaces: the CLI terminal, desktop app, web interface, IDE integrations such as VS Code or PyCharm, and GitHub Actions.
- Guidance: your prompt, agent instructions such as
AGENTS.md, and reusable Agent Skills. - Tools: functions that let Codex edit files, search the web, run terminal commands, call MCP servers, and perform other actions.
A tool is a function exposed to the model with a description and an argument schema. Let me show you what I mean on the following example:
- The model receives the user message “What is the weather in Paris?”.
- We have provided the model with 3 tools:
get_weather,get_stock_prices, andchat_with_customer_support. Let’s assume these cover useful ways our users interact with the AI chat in our app. For each tool, we define a description (what it does and when to use it) and an input schema specifying which arguments the LLM should generate. Some tools need no arguments; calling the tool can still be useful. - For the question from step #1, the model selects a matching tool,
get_weather, and produces structured arguments, such as{"location": "Paris"}. - The application (not the LLM!) runs the function and returns its output to the model. For an MCP tool, the application forwards the call to an MCP server, which can run locally or remotely - we’ll get there.
- The model uses that result when it answers the user.
Hope this clarifies how Codex can perform actions on our computer when we run it. The same loop applies when Codex reads a file, runs pytest, searches documentation, or asks an MCP server for data. A tool performs a defined operation. In some cases, the tool’s implementation can call another model or service. The calling model decides when and how to use it.
This mental model makes later features easier to reason about. AGENTS.md and skills shape behavior, MCP expands the available tools and context, and tests provide evidence about whether a change works.
YouTube video
Playing this video connects to YouTube, which may process device and connection data. Read the provider privacy policy.
04 / FASTAPI BACKEND
Build the Wheel Winner API with Codex, uv, and pytest.
Now let’s build the backend. Before generating code, we’ll design the smallest useful slice of the application: one endpoint with an explicit request and response contract.
Clear contracts give the agent a target and give us a way to verify its work, as we discuss in AI Coding Agents: Production Reliability Matters.
From wheel-winner/backend, give Codex this prompt:
Build a FastAPI project with a single POST endpoint at /api/pick-winner.

Example request body:
{
  "participants": ["Alice", "Bob", "Clara"]
}

Example response body:
{
  "winner": "Bob",
  "winner_index": 1,
  "participants": ["Alice", "Bob", "Clara"]
}

Requirements:
- Use `uv` to initialize `app/` package, install dependencies and run the app.
- Write code under `app/`.
- Write tests in `tests/` using pytest (`uv run pytest` should pass all tests).
- Review `pyproject.toml` and make any necessary modifications.
- Review and update `README.md` to accurately document the current implementation for developers.
That prompt produces a reviewable API-first boundary. In the finished code, backend/app/main.py validates and cleans names, calls the randomizer, and returns the response model. backend/app/randomizer.py keeps winner selection separate so the behavior can be tested deterministically.
Run the generated tests, then start the application and exercise the endpoint through FastAPI’s Swagger UI:
uv run pytest
uv run uvicorn app.main:app --reload
Open http://127.0.0.1:8000/docs, send the example request, and compare the response with the agreed contract. If the structure needs adjustment, resume the same context with codex resume --last, explain the design change, review the diff, and rerun the tests.
Create the Git repository with Codex
Try non-interactive execution with Codex:
codex e --skip-git-repo-check "initialize local git repo with main branch"
The skip flag is needed here because the directory is not a Git repository yet. After initialization, Codex can generate the .gitignore, create a commit, and use the GitHub CLI to create and push a private repository. The underlying commands remain ordinary Git and GitHub CLI operations:
git init
git branch -m main
git add .
git commit -m "feat: randomizer wheel prototype"
gh repo create randomizer-wheel --private --source=. --push
The key habits are simple: check the session directory, design the API before the full interface, keep the first feature small, and test generated code. The companion article on guiding AI coding agents to write better pytest tests extends that review loop.
Build stronger Python testing skills with the complete Pytest course.
View courseYouTube video
Playing this video connects to YouTube, which may process device and connection data. Read the provider privacy policy.
05 / PLAN MODE
Agree on the frontend design before Codex edits multiple files.
Next, we’ll build the frontend in the same repository. The task spans HTML, CSS, JavaScript, and the existing API, so let’s enter plan mode with /plan before implementation.
Start with this request:
Implement frontend for this application. Use these requirements:

- One-page HTML UI.
- CSS for a nice layout.
- JavaScript for wheel drawing and animation.
Codex inspects the existing backend, proposes a plan, and waits while we refine it. This is the point to settle how the frontend calls POST /api/pick-winner, where static files live, how the wheel represents participants, and what happens during loading, errors, and animation. Once the plan matches the design, we switch to implementation and review the generated files.
You are in charge of your software product. Be opinionated about its design, challenge the agent’s assumptions, and keep reliability and scalability in mind. Choose the simplest solution that meets your requirements.
The finished repository keeps the browser side dependency-free in frontend/index.html, frontend/styles.css, and frontend/app.js. FastAPI serves those files and the API from one application.
Use Plan Mode for complex tasks:
- multi-step features;
- changes involving several modules;
- refactoring;
- external integrations;
- architecture exploration and brainstorming.
Planning is a collaboration step. Ask questions, correct assumptions, and make the acceptance criteria observable before code generation. The current Codex command documentation explains /plan and the other session commands.
YouTube video
Playing this video connects to YouTube, which may process device and connection data. Read the provider privacy policy.
06 / AGENTS.MD
Store operational policy where Codex can apply it to future tasks.
In this part, we’ll explore how to scale a Codex workflow beyond a small prototype. That starts with moving important project rules from chat history into repository guidance.
Run /init to generate an initial AGENTS.md, then review it yourself. This file should tell Codex how to work: concrete commands, repository boundaries, conventions, constraints, and required verification. It should not duplicate the README’s product description. Rule of thumb: README.md is for humans; AGENTS.md is for agents.
The course repository’s AGENTS.md records the frontend and backend boundaries, uv commands, testing expectations, commit conventions, security rules, and the policy for using current documentation.
Scope follows the files involved in the task. Put shared policy at the repository root and add a deeper AGENTS.md only when a real boundary such as a backend, frontend, package, or infrastructure directory needs more specific instructions. An AGENTS.override.md temporarily replaces the normal instructions in its scope, which makes it useful for situations such as a release freeze or incident response.
Next, let’s turn policy into executable checks. The real CI workflow runs pytest with branch coverage on pushes and pull requests. The project enforces at least 90% coverage in backend/pyproject.toml, writes a coverage XML report, and calls a reusable action that reports overall and pull request diff coverage.
This division is deliberate: AGENTS.md tells Codex what process to follow, while CI independently checks stable requirements. The official AGENTS.md guide documents the current discovery and precedence rules.
YouTube video
Playing this video connects to YouTube, which may process device and connection data. Read the provider privacy policy.
07 / AGENT SKILLS
Turn the Docker workflow into a reusable Codex skill.
Now we’re ready to create the project’s fastapi-dockerizer Agent Skill with $skill-creator. Agent instructions (learned in the last episode) apply operational policy to work in a repository. An Agent Skill packages a focused workflow that Codex can discover and reuse only when needed.
Think of a skill as a reusable recipe for Codex. At the start of a session, Codex normally sees the names of available skills and short descriptions of when to use them, e.g. “Dockerize and maintain containerization for FastAPI applications. Use when Codex needs to add or update Dockerfiles.” In the description, you don’t explain to Codex yet how to work with Docker in your app - you just say, “Hey, if you change something related to containerization or deployment, retrieve some more info from this skill - it has all the necessary guidance for you, my dear AI agent.” The description and full skill instructions live in a SKILL.md file and can come with helper scripts, templates, or reference documents. Super useful to let the agent retrieve some extra guidance only when needed.
Why is it important to offload some guidance to skills?
Imagine your team has a huge application with 1000s of use cases. If you add guidance about each possible scenario for all possible aspects of your app, it will add a lot of noise to the agent’s context. Just imagine you ask Codex to rename a variable, and before even starting with this simple request, Codex gets instructions about Kubernetes clusters, database administration, and how authentication layers are structured. All this guidance is absolutely crucial in some situations, but absolutely useless for this specific request. It can also fill the agent’s context window unnecessarily. Therefore, we offload some task-specific information from AGENTS.md to agent skills when not every single agent session needs it. For skills, Codex initially gets brief metadata, including their names and descriptions, so it can read the full instructions when it thinks they are relevant. This concept is called Progressive Disclosure.
How do you create agent skills?
You can do it manually using the official documentation, or just use AI to create AI skills! Of course, we choose the second option.
Ask Skill Creator to maintain containerization for the FastAPI application, keep uv as the dependency manager, ask for the local host port, maintain a root .dockerignore and justfile, and require a GET /health endpoint. Include example trigger prompts such as:
Dockerize this FastAPI app.
Make this app ready to run in a container.
Add or update local Docker commands.
Update justfile smoke checks to call /health.
Update app deployment pipeline.
The generated skill is committed at .codex/skills/fastapi-dockerizer/SKILL.md. It includes a focused workflow, Dockerfile and Just guidance, validation requirements, UI metadata in agents/openai.yaml, and a detailed checklist under references/.
The course recording uses the .codex/skills/ location shown above. For new repository skills, use .agents/skills/<name>/SKILL.md, as described in the current Codex skill locations.
You can invoke any skill explicitly with $<skill-name>, browse skills with /skills, or let Codex select it when the request matches its description.
Keep these rules in mind when creating the skill:
- create skills with
$skill-creator; - keep one skill focused on one job;
- write imperative, recipe-style instructions;
- include clear example triggers in the description;
- test both explicit and implicit invocation.
Install Docker and Just before reproducing the container exercise. The official Agent Skills guide documents the current skill format and locations.
YouTube video
Playing this video connects to YouTube, which may process device and connection data. Read the provider privacy policy.
08 / MCP AND DEPLOYMENT
Give Codex current documentation, then ship the container to Cloud Run.
Let’s connect Codex to Context7 through the Model Context Protocol (MCP). MCP extends Codex with external tools and context. You can think of an MCP server as a service that exposes tools (functions) your agent can call. That service can run locally on your computer or on a remote server. I like to think of MCP as a common API protocol for agents: it standardizes how they discover available tools, understand their arguments, call them, and receive results.
You absolutely can implement a regular tool locally that sends an HTTP request to some remote server to, for example, get relevant data about sales in your store. If that service already provides an MCP server, you can connect Codex to it and use its tools instead of writing that integration yourself. Thus, MCP protocol just provides a standard way for compatible agents to discover and call them.
In this part, we connect to one useful MCP server - Context7 - so that Codex can consult current library documentation during code generation instead of relying only on model memory.
Install Context7 for this Codex project with:
npx ctx7 setup --codex --project
The resulting .codex/config.toml registers the remote MCP server:
[mcp_servers.context7]
type = "http"
url = "https://mcp.context7.com/mcp"
First, ask Codex, How to make fixtures with pytest? Then start a clean session and give it a real refactoring task using Context7:
Refactor test_api.py to use session-scoped fixture for TestClient.
Use context7
You can see that result in backend/tests/test_api.py: the shared client fixture uses scope="session" and yields a TestClient from a context manager.
Next, we’ll use Codex and MCP in a higher-stakes workflow: Terraform-based infrastructure and continuous deployment. After authenticating the Google Cloud CLI and selecting a billed project, Codex adds three Terraform roots:
infra/bootstrapcreates the Terraform state bucket and GitHub OIDC deployment identity;infra/foundationenables runtime APIs, creates Artifact Registry, and creates the Cloud Run service account;infra/applicationdeploys the public Cloud Run service from a container image tagged with the Git commit SHA.
The real deployment workflow authenticates with Workload Identity Federation, applies the foundation stack, builds and pushes an image tagged with the Git commit SHA, applies the application stack, and calls /health. The architecture avoids a long-lived Google Cloud key in GitHub.
Review infrastructure plans and generated IAM rules before applying them. The repository’s deployment architecture and setup guide document the exact lifecycle.
Keep these resources handy:
YouTube video
Playing this video connects to YouTube, which may process device and connection data. Read the provider privacy policy.
09 / AUTOMATED CODE REVIEW
Run a Codex review on every pull request.
To finish, let’s add Codex to GitHub Actions so review feedback appears automatically on pull requests. It gives each change a first pass for correctness bugs, security issues, regressions, and missing tests before a developer reviews it.
Tests and coverage check the behavior you’ve already thought to verify. AI review can spot gaps by reading the diff and surrounding code. Keep both: run deterministic checks in CI and use Codex’s findings to guide human review.
The course repository’s AI Review workflow runs Codex in a read-only sandbox using a dedicated review prompt. It loads the prompt and configuration from the trusted base commit, and a separate job posts the response as a PR comment.
To use it, follow the setup guide: add an OPENAI_API_KEY repository secret and merge the workflow, configuration, and prompt into main. Reviews then run for PRs from branches in the same repository; fork PRs are skipped.
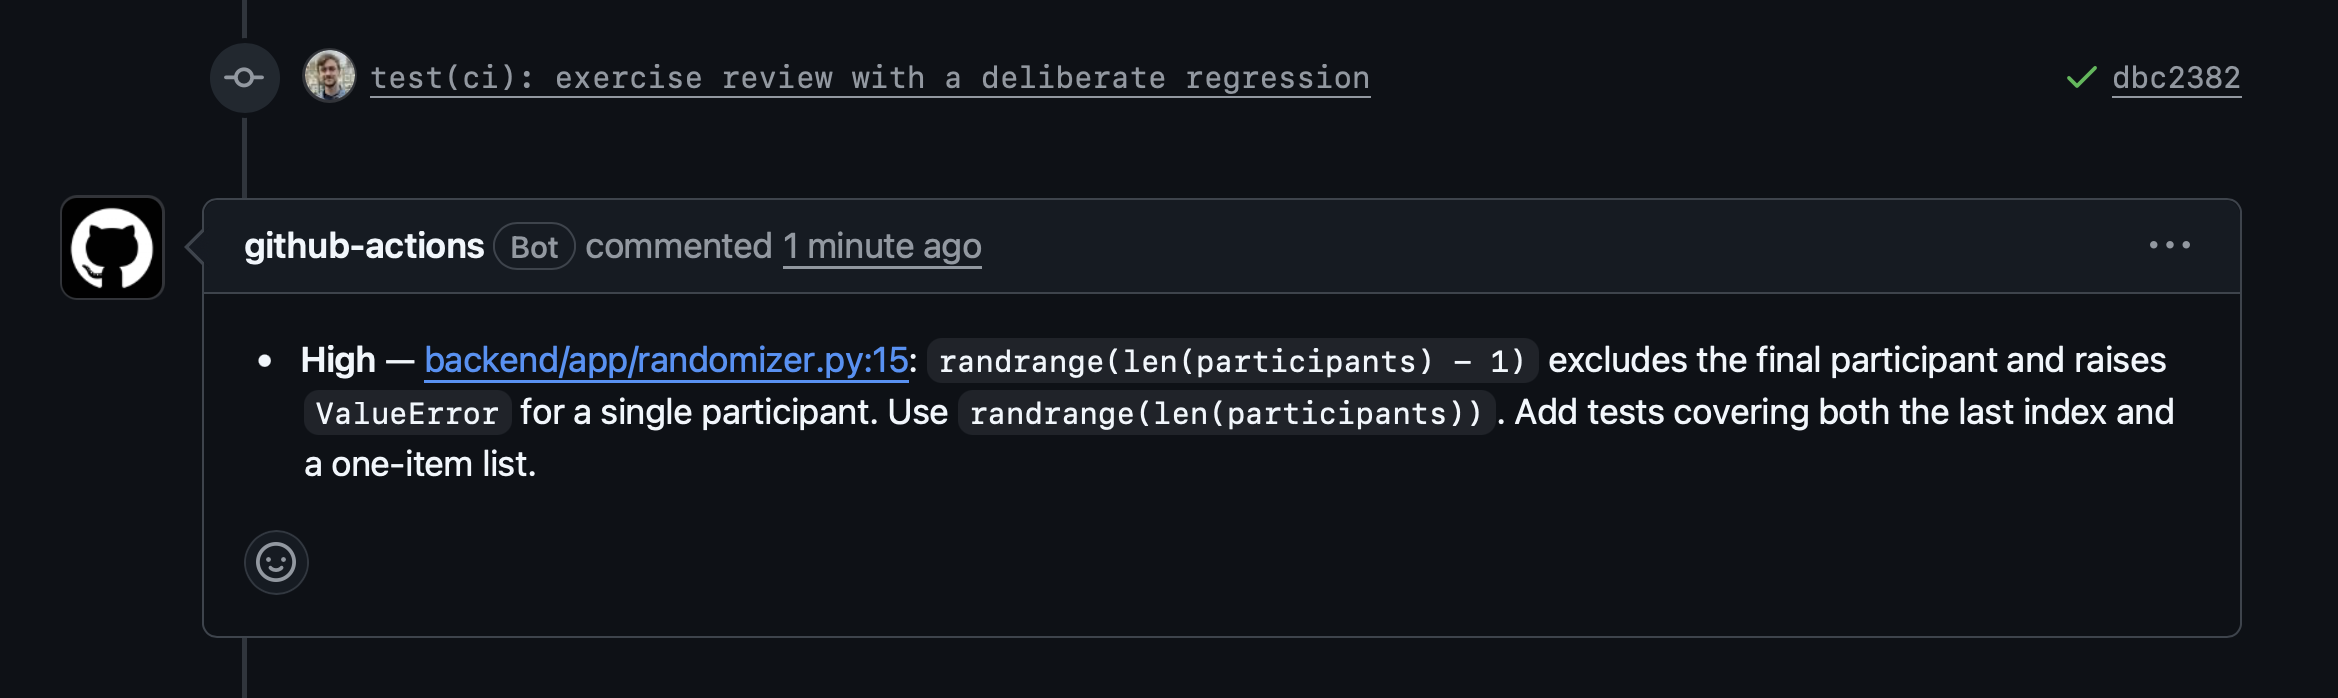
See the example review on PR #9.
YouTube video
Playing this video connects to YouTube, which may process device and connection data. Read the provider privacy policy.
10 / COMMON QUESTIONS
Common questions about the Codex course.
What is OpenAI Codex?
OpenAI Codex is a coding agent that can inspect repositories, edit files, run commands, use external tools, and review changes.
What will I build in this course?
You’ll build Wheel Winner, a randomizer with a FastAPI backend and a browser frontend. Along the way, you’ll add automated tests, containerize and deploy the app, and set up continuous deployment and AI code reviews.
Is this OpenAI Codex course free?
Yes. The article, seven videos, and course repository are free to access. Following the exercises can involve Codex usage, API charges, and Google Cloud costs; check the current Codex pricing for access options and usage limits.
Do I need an OpenAI API key?
You can use interactive Codex through a supported ChatGPT plan without supplying an API key. The GitHub Actions review workflow in this course requires an OPENAI_API_KEY repository secret, and its API usage is billed separately from your ChatGPT subscription.
What are the prerequisites for the course?
You should be comfortable with a terminal, Git, and reading application code. Basic Python knowledge helps; we’ll introduce the other tools as we use them.
How do I install and start Codex?
Follow the quick start, check the installation with codex --help, then run codex from your project directory. This course starts in an empty wheel-winner/backend directory.
How do AGENTS.md, skills, and MCP differ?
AGENTS.md provides persistent project guidance, skills package reusable workflows, and MCP connects Codex to external tools and context. In this course, we use them for repository conventions, a Docker workflow, and access to current documentation through Context7.
How does Codex differ from ChatGPT?
Codex focuses on software development tasks involving repository files, commands, diffs, and code review. ChatGPT covers a broader range of conversations and tasks; here, we use Codex to work directly with the application and verify changes.
Start with episode one, keep the finished repository open for comparison, and follow the full playlist.
More field notes
Keep reading.
AI Coding Agents: Best Practices for Reliable Software
AI coding agents make implementation faster. The harder question is how to trust the result as the software grows. Clear requirements, useful tests, and readable code give developers a way to keep control.
AI coding agentsproduction reliabilityWrite Python Tests with AI: Build a Pytest Skill
See how AI-generated tests can repeat a bug or expose it. Connect clear requirements to a pytest testing harness, then collect the workflow into a reusable skill.
Python testingpytestPytest for Beginners: Write and Run Your First Python Test
Write your first pytest test for a shipping rule, learn to read a failure, and catch a bug that a passing test misses. Follow each step in a small Python example.
pytestPython testing